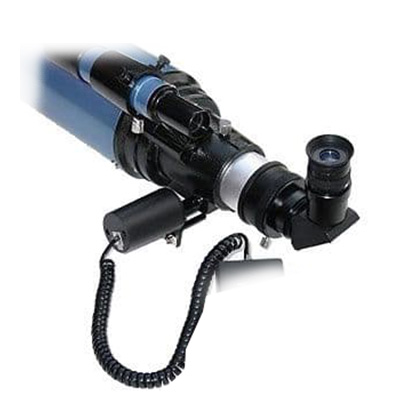
Sky-watcher Auto-focuser by Sky-Watcher
 Sky-watcher Auto-focuser
Hands-free D.C. focusing device, for accurate focusing, with the minimum of vibration. Dual speed push-button operation (fast & slow).
Price: £65.00
Tag : auto-focuser
 Sky-watcher Auto-focuser
Hands-free D.C. focusing device, for accurate focusing, with the minimum of vibration. Dual speed push-button operation (fast & slow).
Price: £65.00
In the past I have attached the Skywatcher Auto Focusers to my Skywatcher ED120 and ED80 DS-Pro models, so as soon as I purchased a new Skywatcher Equinox 66 I immediately went out and purchased another Skywatcher Auto Focuser and set to work attaching it to my Equinox 66.
These simple jobs rarely are simple as I was about to find out. The main problem I previously had with the DS-Pro models was that you had to completely remove the focuser in order to attach the DC motor part to the pin part of the focuser. This time with the Equinox 66 this problem also occurred – but so did the issue that the bracket supplied with the Skywatcher Auto Focuser does not fit/line up with the screw holes found on the underneath of the Equinox 66.
But don’t worry with a couple of extra drill holes in the bracket and some bashing of the bracket with a hammer the attachment of the Skywatcher Auto Focuser to a Skywatcher Equinox 66mm telescope is possible.
Step 1:
Remove the focuser knob from the single speed side of the telescope focuser by inserting an allen key into the hole of the focuser and loosening it.
Step 2:
Drill the extra 2 holes required in the bracket so that they match the screw positions on the bottom of the Equinox 66.
Step 3:
Now completely or as best you can loosen all the screws that attach the focuser to the telescope, you should then be able to move the focuser at an angle, or remove it completely. Slide on the DC motor onto the pin and tighten it with the supplied allen key. Make sure you tighten it in the right position by either laying the bracket in position or by actually fitting the bracket first to see if the screw holes line up between both parts.
Step 4:
With the motor in place now attach the bracket by using the 4 new screws supplied with the Auto Focuser. Be careful not to dislodge and lose the small rubber washers inside the telescope focuser when tightening everything up.
Step 5:
Now bring together the bracket and the DC motor and try screwing both parts together with the thumbscrews and metal washers provided with the Auto Focuser. If they do not align up very well, then you will need to remove the bracket and change the angle of the bracket to bend it to the correct position. I used a hammer for this.
The End: You should now have it completed. Just try it out.